
Cars are easy. You sit down, adjust your seat and mirrors, and you’re generally ready to drive away. But as any seasoned rider would know, setting up your motorcycle ergonomics are nowhere near as straight-forward. You have to consider your height, weight, reach, feet position, suspension sag, and a whole lot more.
While every rider will have their own quirks and needs, thankfully, there are some general steps that can improve any rider’s positioning and comfort. So to help keep you as comfortable as possible on the road, we’ve prepared a guide to mastering your motorcycle ergo, and ensuring your ride is safe in the process.
Step 1: Your handlebars and levers
Most riders will buy their bike, leave everything where it was, and adapt their technique to suit their bike. It begs the question – would many car drivers simply leave the seat and mirrors where they are, and adjust their positioning to suit?
If you’ve recently started riding your bike, there are some adjustments you should make before you settle in.
Handlebars
Broad shoulders demand broad handlebars. Narrow shoulders prefer narrow handlebars. It might sound simple, but it’s worth considering what your comfortable reach and range is. If you’re having to reach well outside the line of your body to steer the bike, it’ll grow very uncomfortable, very quickly.
If no adjustments can be made to your specific bike, aftermarket handlebars can usually offer you the reach that best suits you.
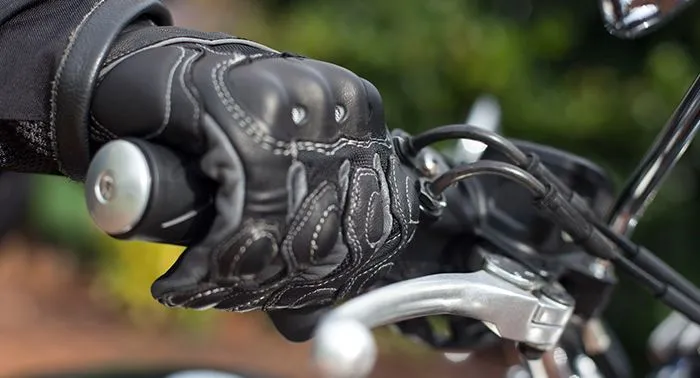
Lever height
One thing you should never do is twist your hand to reach the brake lever. Imagine you need to stop in a hurry, but because your brake lever is positioned quite high, you need to lift your hand to reach it. In lifting your hand up, what you actually do is accelerate. Not only is this uncomfortable, in an emergency, it can actually be quite dangerous.
Just like the rider in the photo above, the brake lever should be positioned low enough that as you reach for it, you don’t need to twist your wrist. After thousands of kilometres travelled, your perfectly healthy wrists will thank you for the effort.
Lever depth
Biologically speaking, our middle finger has a lot of power, whereas our index finger tends to have more control, and finesse. So in a braking situation, you want the full reach of your index and middle finger to stop the bike, whereas it helps if you can use the tip of your index finger to gently release the brake.
Based on that, if you reach for the brake lever with your hand on the throttle, the first knuckle of your index finger should just be able to grip around the lever. Any further away, and you won’t have enough control. Any closer, and you could actually be denying yourself room in the lever, and stopping power in an emergency.
Step 2: Setting up your suspension

This one might be tricky for new riders, but it’s possibly one of the most important steps you can take when setting up your motorcycle ergo.
“Rider sag” is how much the suspension compresses under the weight of the rider, when sitting still. This is important, because too much (or too little) sag could mean you’re pushing the edges of how far your springs can travel. If the springs can’t take any more of the shock out of bumps, you’re going to feel them – and that is probably going to hurt.
Most experts (like the ones at Australian Motorcycle News) will agree that your rider sag should be set to around 25mm to 40mm. So, to set your bike to the right level, you’ll need to:
-
Measure the suspension fully extended – Start with the front wheel of the bike. You’ll need to take all the weight off that wheel, either by having someone carefully tilt the bike over the side stand (so the front wheel is off the ground), or by using a centre stand. Once the suspension is fully extended, measure the exposed section of the fork leg (that’s the narrower piece of your suspension, that will change length as the suspension moves). In our photo above, the fork leg is at the top.
-
Measure the suspension under the rider’s weight – For this, the rider is going to need to have their feet off the ground, so balancing can be an issue. The easiest solutions are either a front wheel chock, or to set up next to a wall the rider can use to balance themselves. Once the bike is at rest under the rider’s full weight (including all their riding gear), measure the same section of the fork leg.
-
Time to do some maths – This is where you’re going to need to work out your total sag. Thankfully, it’s a pretty simple equation:
- Sag = (Suspension fully extended) - (Suspension under weight)
-
Adjust your pre-load as necessary – If your sag figure works out to less than 25mm, it means you may need to take away some pre-load. If your figure is over 40mm, you might need to add some pre-load. On most bikes this is a pretty simple process, but make sure you always consult the owner’s manual from the bike manufacturer, or have a licensed mechanic help. If you’ve reached the limits of your pre-load and can’t achieve a good level of sag, it might be time to consider getting new suspension for your bike.
-
Repeat for the real wheel – The only difference when measuring sag in the rear wheel is that the fork leg is sometimes difficult to access. If it’s too much of a hassle, you can measure from the exact centre of the wheel to an obvious point above the wheel. In our photo below, you could use the mid-point of the rear wheel, and the mudguard above it. Just make sure you use the same spot on the guard for all your measurements.
Step 3: Consider what else you might need

There are still some changes you can make to your motorcycle ergonomics. Once your grip and suspension are sorted, it’s worth considering:
-
Your windscreen - If your riding position is quite high, the windscreen could actually be hitting you with more air, rather than less. Consider how high (or low) your natural position is, and consider aftermarket windscreens if necessary.
-
Rear levers and seat position - It’s hard to make concrete recommendations on seat heights and leg positions, given most bikes have unique riding positions. One tool you can use is Cycle Ergo, an interactive system online that allows you to search for your model of bike and enter your personal measurements. It will tell you what seat height is recommended, and how to position your legs.
Master your insurance
Find a level of cover that suits you and get 15%^ off your first year’s premium when you buy a new policy online.
Learn more and get a quote with us today!
See More Guides